For kids, bandages are simply these Band Aids used to cover their booboos. It is not uncommon to see drug stores with various cartoon character designed Band Aids. First aid and CPR course providers will explain more about the proper use of bandages. However, in first aid training, bandaging has three purposes:
(1) apply pressure to bleeding wounds
(2) cover burns and wounds and
(3) provide support and immobilization for broken bones. There are three types of bandages: triangular, ace and tubular.
The most versatile is the triangular bandage, which can be made from cloth or paper. If unfolded, the triangular bandage can be utilized as a cover bandage or support sling. On the other hand, when folded, they may be utilized for support or pressure. Additionally, they can be turned into a pad, which can be utilized as cold compress or for padding. Usually, triangular bandages are created from washable cotton. If triangular bandage is desired as a cold compress or padding or to apply pressure with a dressing,
(1) a narrow fold bandage must be used
(2) the two ends folded into the middle and
(3) the ends should be folded into the middle until apposite size is attained. If triangular bandage is desired as a broad fold to support for broken bones or hold dressings loosely in place,
(1) the point should be folded to the base of the bandage and
(2) the bandage should then be folded again in half, thus creating a bold fold.
To use the triangular bandage as a narrow fold to control bleeding,
(1) continuing from the second step of the broad fold, the broad fold should again be folded in half.
A square knot is best used to tie a bandage as it does not press into the injured person and is stress-free to untie. Bows, pins, taps and clips may be used as fasteners. To tie a square knot:
(1) the right end of the bandage must be passed over the left and tucked under,
(2) both ends brought alongside together,
(3) the left end of the bandage passed over the right and tucked under and
(4) both ends pulled firmly for the completed knot.
To create a foot cover bandage, still using a triangular bandage:
(1) a hem along the base of the triangular bandage should be folded, placing the victim’s foot on the bandage and bringing the point down toward the victim’s ankle.
(2) The bandage should be folded up over the foot.
(3) Both ends of the bandage folded around the ankle and tied loosely.
(4) The point of the bandage pulled over the knot to be tucked away.
Ace bandages are utilized for support and hold the dressings in place, mainly for sprains and strains. Ace bandages are predominantly made of cotton, gauze or linen, fastened by pins or tape to remain in place. There are different types of ace bandages, open weave to apply light dressings, conforming to secure dressings and give support, and crepe to support but particular for joint sprains. If an ace bandage is to be applied:
(1) bandage should be partly unrolled.
(2) Unrolled end be placed below the injury and two complete turns completed around the limb to safeguard the bandage in place.
(3) By using spiral turns, the limb should be bandaged up.
(4) By a single turn, the bandage should be finished off and fastened in place using any of the aforementioned tools.
(5) There should be enough length left to do complete turns of the limb to tie off an ace bandage. A knot should be tied at the bottom of the split and placed on both ends around the limb, one in each direction. A square knot or bow may be used to tie.
Lastly, tubular bandages may either be small or large. The former is used to secure the dressings for finger and toe injuries whereas the latter is also used to secure dressings in place for larger areas or supporting joints. Its own applicator is given and tape is used to secure. If a tubular gauze is to be applied,
(1) the gauze should be cut two and half times the length of the injured finger or toe to be pushed on the applicator.
(2) With the dressing placed, the applicator is slid over the injured digit.
(3) With the gauze held at the base of the finger, the applicator is pulled upward, thus the digit is covered with a single layer of gauze.
(4) Above the injured digit, applicator should be twisted twice and pushed back down, then adding another layer of gauze.
(5) To secure the gauze, tape is placed.
Bandaging is not as easy as it seems, with particular instructions to best safeguard an injury. Fortunately, first aid courses are available to teach even the non-medical aspect of the community to treat these wounds. With appropriate training, incorrect bandaging may be avoided to prevent further trauma on injuries and one can observe the advantage of the right bandage. Prior to your enrollment, you have read more about the CPR course outline of the various first aid and CPR trainings that you will undergo.
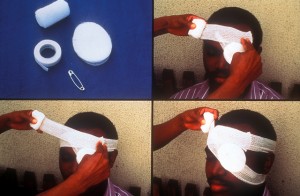
How to apply a Mastoid Bandage? Dr.K.O.Paulose FRCS explains how on this video.
[media url=”http://www.youtube.com/watch?v=shdK5Kaz9hY” width=”600″ height=”400″] [note color=”#4ba5cb”]Emergency First Aid Courses reference for this article:[/note]St. John R [Internet]. ND. Bandaging. Philippines: FirstAid.ph; [cited 2012 Jun 06].
Available from: http://www.firstaid.ph/equipment-medicines-and-complementary-medicine/bandaging.html